
At the beginning of 2014, Paul Kirtley, Stuart Wittke and I did a skiing tour of Haukelifjell and the Setesdal mountains in Norway. A truly epic adventure which Paul made a film about:
Stuart had to fly home after the first week so Paul and I continued. Towards the end of our trip, the sole of my ski boot was ripped off. This added to the excitement of the trip to say the least! Luckily, the hut we had planned to spend the night in was only 1.5 miles away and we made it before nightfall.
Paul had, very considerately, packed a small repair kit. Once at the hut, I used his repair kit and a few other bits and pieces that were in the hut to make the boot last until we had ski-ed off the mountain.
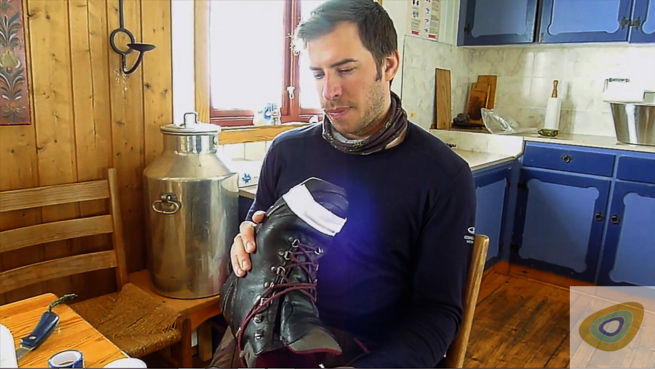
The next day we had some of the best skiing of the trip and truly tested the boot repair. At the end of the day, after skiing off the mountain, the repair had held and we made it to the road in time for our bus.
Once I got back to the UK and having seen first-hand the value of a small repair kit, I vowed to never travel again without one. Like a small cuts kit, this repair kit has proved to be extremely useful. Now that I have been using it for the last 3 years, I feel that I’m in a good position to write an article about what has ended up in it.
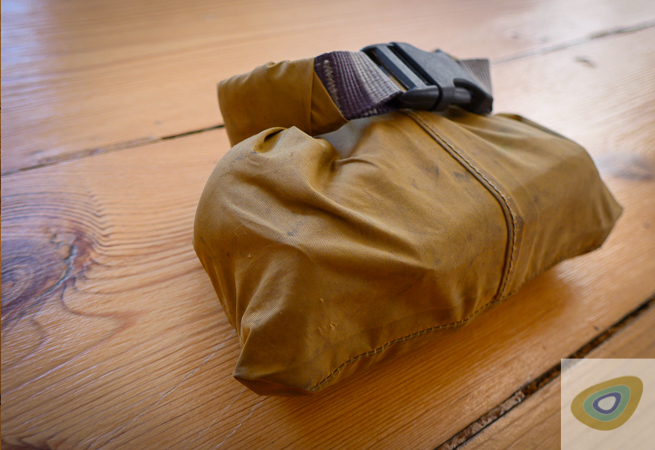
This XXS fold down dry bag contains the repair kit and a few other useful items. These small dry bags are a great way of organising your kit. I also use one for my toilet paper, hand gel and matches. I generally don’t take anything I call a ‘survival kit’ with me on my wilderness travels. My own kit provides the things I need to stay safe in a difficult situation. The closest thing to a survival kit that I take with me is probably my Repair Kit.
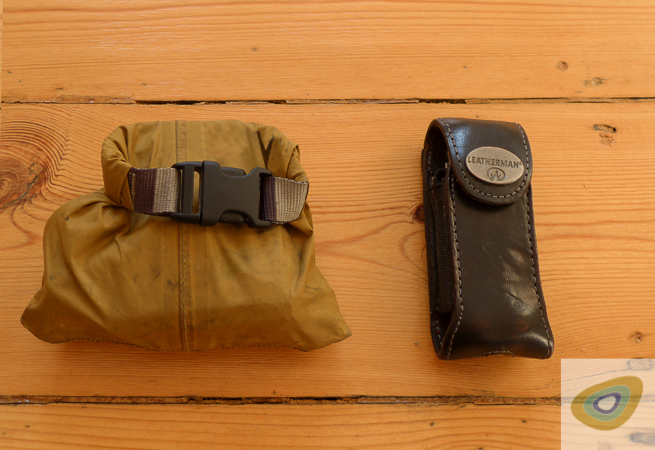
Usually when I’m outdoors I have some form of cutting tool with me. If I am travelling by any means other than walking, I might take a multi tool. Multi tools are very useful for repair jobs such as; mending ski bindings, fixing crampons or for making repairs and modifications to a canoe outfit to name just a few, but they are extremely heavy. I have used my Leatherman Charge ALX for the past 9 years and I am very happy with it. However, it weighs 235 grams or 8.3 oz. and that’s without the case and attachment rack. I find that this is too much extra weight for a back-packing trip so I usually take a small pocket knife.

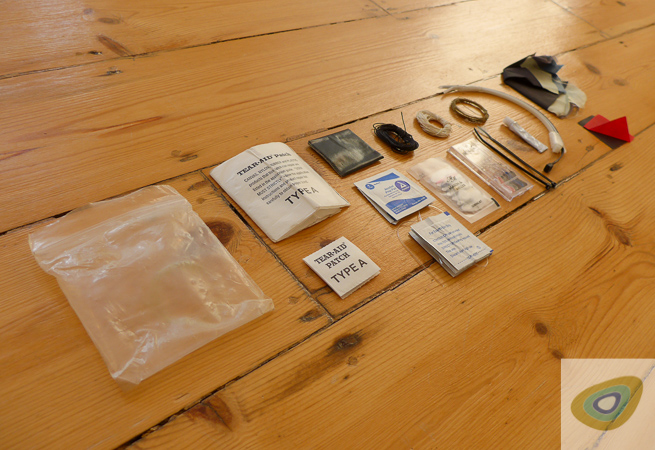
The fold down dry bag usually contains a small head torch, the Repair Kit, a lighter and some Paracord. The Repair Kit is kept in a heavy-duty plastic zip lock bag which measures 100mm long x 100mm wide x 25mm deep and contains an array of different items to help me repair my kit on the go.
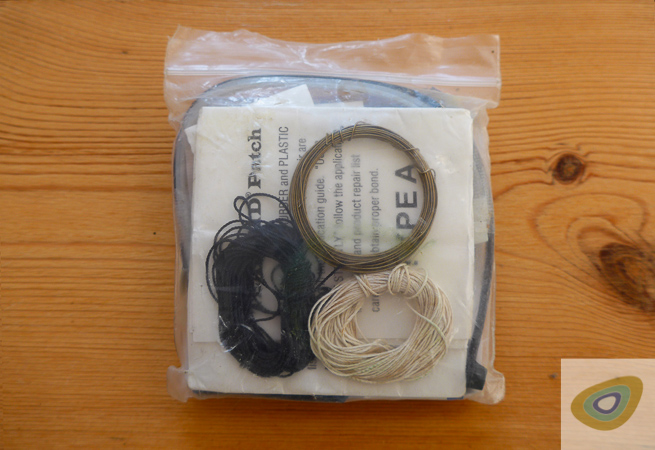
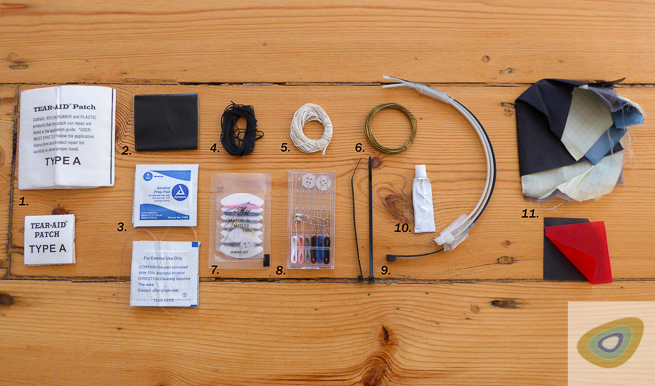
- These patches are fantastic for on the go repairs, fixing holes in canvas, nylon, rubber, and plastic.
- Duct tape, always handy for putting all sorts of things back together. I have about 1.5 metres of it wrapped around a thin piece of plastic.
- Alcohol Prep Pads and reinforcement filament line that comes with the TEAR-AID pack. Can also be used to prepare surfaces for other glue based repairs.
- Black waxed whipping twine. I do a lot of sailing, and knowing how strong and durable sailmakers cord is, I have added several metres of it to my Repair Kit.
- White whipping twine, like item 4, but this twine is slightly thinner and allows me to sew with it through thicker fabric.
- Brass wire 0.5mm thick. This item is generally used in bushcraft for making rabbit or squirrel snares. This wire is very strong and flexible, great if your backpack strap starts to fail.
- Small sewing kit with needles, multiple threads, buttons, and safety pin in a sealed plastic packet. Pick them up at your local convenience store, or a well-equipped guest house bathroom. Thanks -The Goat Inn.
- A slightly larger sewing kit in a hard plastic case, again with needles, multiple threads, buttons, and safety pins.
- Three different sizes of cable ties. Quick and easy to use, cable ties are an essential part of any repair kit, as my broken ski boot proved.
- Seam Grip seam sealant glue, used for repairing Therm-a-Rest mattresses. This came in very handy for Matt Batham on our Scottish 4000s expedition.
- A collection of fabric patches consolidated from my various tent repair kits through the years. Very useful for all sorts of tent and clothing malfunctions.

Over the years, I have adapted what I use and what I carry. This has come about by my own experimentation and by talking to knowledgeable colleagues and some of the great clients we have at Frontier Bushcraft.
Do you take any general or specific items in your repair kits on wilderness journeys?
Latest posts by Henry Landon (see all)
- How To Look After Your Feet Outdoors - October 29, 2024
- A Springtime Feast: Cooking Up A Treat In The Woods - April 22, 2020
- Getting Fit For Your Next Adventure - April 10, 2020
Steve Bayley
A 4″ length of hot-melt glue (melt with your lighter) is good for all sorts including thermarest punctures. I also have a tiny screwdriver which fits into the corkscrew of my Swiss army penknife to take care of the screws that hold my glasses together. A paper-clip is a useful source of easily bent & cut wire to hold the arm of your glasses on if you’ve lost the screw all together! I guess you’ve got a big, sturdy needle in there for the whipping-twine, I also pack a curved needle in case you can only access one side of what you’re trying to sew up. I also have a replacement buckle for the hip-belt of my bergan, this is a difficult thing to fix in the field. I know this from bitter experience!
Henry
Hi Steve,
Thanks for your comment and for your tips on what you take in your repair kit. Hot melt glue is very handy to have to repair thermerests, which can really put a dampener on a trip if they start to leak and can’t be repaired. Paper clips are useful for quick repairs but I find that they have a tendency to snap if over worked, the brass wire is a bit more durable but can still with time be worked to breaking point if you don’t have anything to cut it with you.
Again thanks for your tips and taking the time to share,
Cheers,
Henry
Gary
Great article and tips. I have carried a repair kit for many years now. However, I have never had to use it. But, it is always with me just in case. Better to have something and not need it than to need it and not have it. After, reading this article I will be modifying my kit slightly and adding a few more items to it. Thanks!
Henry
Hi Gary,
Thanks for your comment, I’m glad the article has been useful for you. As you say it is better to have it and not need it than the other way round. I hope it has shed some light on good things to add to your seasoned repair kit.
Cheers,
Henry
Steve
Nice article Henry.
Some things I carry in my repair kit that you might find useful is 1. A leatherman squirt with the pliers 2. A length of artificial sinew, you can split it down up to 5 times if you need thinner thread. If you can’t artificial sinew then dental floss is a good alternative though you can’t split it down. Just make sure you get the unflavoured version :o) and finally 3. A leather awl for using on a multitude of sewing jobs. It’s a great help when you have to get a needle through some tough materials.
Cheers
Steve
Henry
Hi Steve,
Some great tips thanks for taking the time to add them, I haven’t tried the leatherman squirt but at under 60g it seems like a good alternative to a full size one. I tend to take the repair tool for my MSR stove which can perform some of these tasks, but as a specific item to my stove I didn’t include it in the article. Nice idea with the artificial sinew and the dental floss, I will do some experimenting.
Thanks,
Henry
Pär Leijonufvud
Good kit, some comments on my setup.
I prefer the 0.30 mm stainless steel wire to the brass one: it is also ok for snaring ptarmigan in an emergency (even if it is on the thin side for hares).
For thread i basically only carry the standard; dental floss. Needles go in a Sami style needle case (I find that the plastic cases break too frequently, in particular in cold climates.
I do carry some wool yarn (and one of the needle is a darning needle): good for socks that develop holes.
Henry
Hi Pär,
Thank you for your comment, very useful and practical advice particularly for cold climates. I agree that the plastic cases are not ideal in the cold and having a darning needle is handy for those sock and clothing malfunctions.
Best wishes,
Henry