
Hand drill is an elegantly simple technique of fire-lighting.
Yet it is commonly seen as a more advanced technique of friction fire-lighting than the bow-drill method.
This is not necessarily the case.
It is just a different technique.
In terms of determining which technique may be more difficult in particular circumstances, you must also consider the context, the competence of the practitioner, the environment and the prevailing weather conditions.
The combination of these factors will determine the most appropriate method when one of these techniques must be relied upon for a fire.
Bow drill has become a central part of bushcraft teaching, certainly in the UK. There are several reasons for this.
Bow drill is the most widely-applicable technique of friction fire lighting. This is true in both terms of environmental conditions and available materials.
From cold, wet conditions to warm and dry conditions, bow-drill will work as long as you have suitably robust cordage material. You can also choose from a wide range of materials with which to construct your bow drill set.
Hand drill, on the other hand, is somewhat more fussy.
It is most suited to warm and dry environments such as found in parts of Africa as well as Australia. It is most commonly associated with the indigenous peoples of these areas.
In a survival situation, bow drill has the advantage that you can go and make a set and create fire immediately.
Hand drill, by contrast, often requires you to seek out quite specific materials to make the set – particularly the drill – then often requires some time to prepare these materials so that they are in the correct condition for use. This makes the technique one that is less immediate and therefore potentially less useful in a general survival scenario.
Once you have a hand drill made, however, it is often quicker and easier to create an ember with this technique than it is to create an ember by making a bow drill set from scratch. Hence, indigenous peoples who use hand drill typically carry the drill with them as part of their equipment, often along with arrows. This is certainly true of the bushmen of the Kalahari and the Hadzabe people of Tanzania.

So, what about using hand drill in temperate conditions such as the UK?
Well, hand drill is an elegantly simple technique of friction fire lighting and when used competently is very effective. Similar to the case in Africa, you need to prepare the drill in advance. Also similar to the case in Africa there are more choices available for the hearth than there are for the drill.
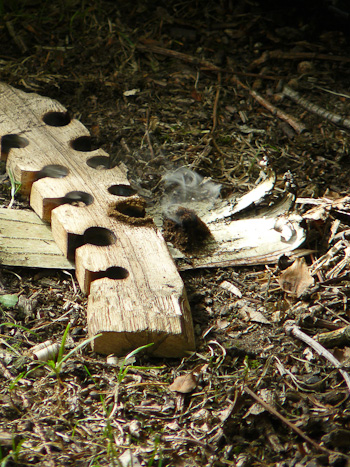
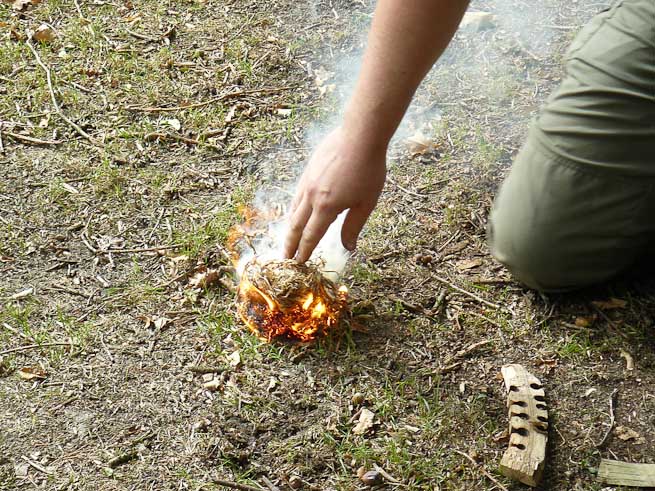
It is worth noting that the ember created with a hand drill is generally much smaller than that created with a bow drill. This means there is less heat in the ember, which in turn means it is critical that you properly prepare the tinder in which you will place the ember.
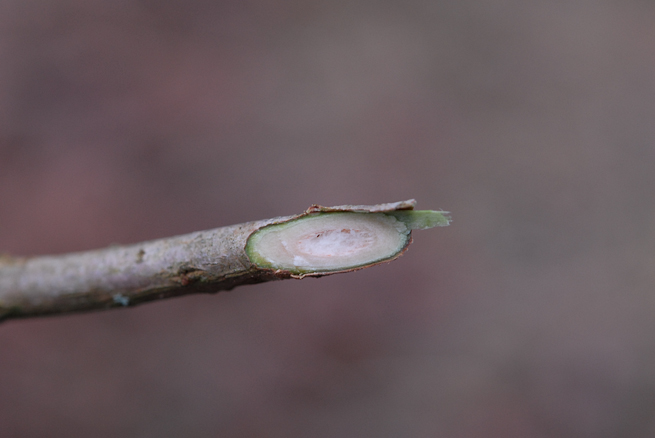
If you’re a beginner with hand drill in the UK – or more widely the northern temperate environment such as found in Europe and parts of North America – then a good drill material to start with is a member of the Sambucus sp. commonly known as elder.
Elders put up straight shoots which can be used to make a very good hand drill. The best shoots are often secondary growths which are striving to head upwards out of the bush to reach the light. Even though they have a pith in the middle, they have quite thick sidewalls. You always should select a live shoot. If the bark of the shoot is green it is too young. Wait until the bark is grey before harvesting for a potential hand drill. The diameter of the harvested shoot should be about 15 mm at the base.
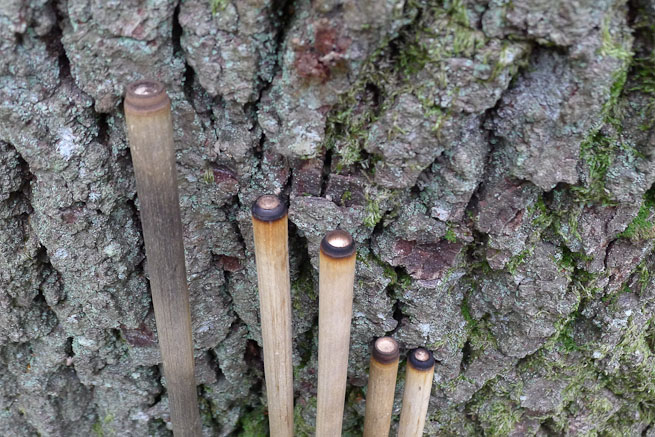
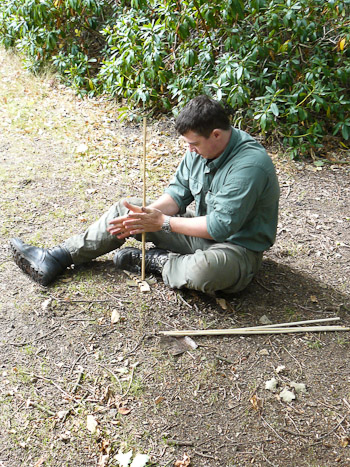
To prepare the drill, first the bark should be scraped off. This can be done with the back of your knife and is quite straightforward. Even the straightest looking shoots will have kinks and slight bends in them. These need to be straightened out. What you’re aiming for is a drill that is dowel-straight.
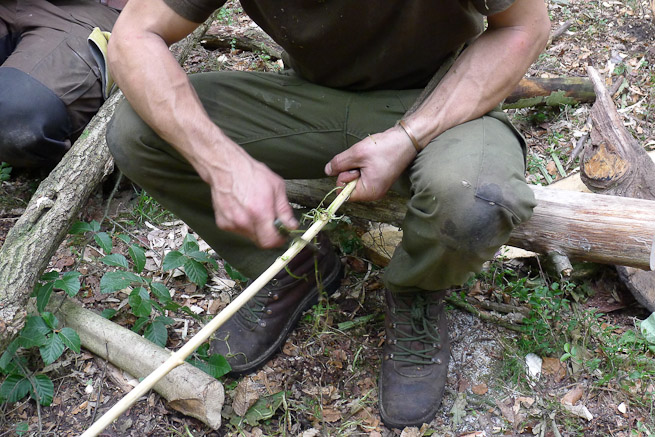
The best way to achieve this is by the application of heat. Your campfire is ideal. You need a good base of embers to provide an even heat. By passing the drill over the heat, concentrating on the area that needs to be straightened, the drill will be softened sufficiently so that it can be manipulated into a straighter configuration.

Keep working on the drill, straightening out the kinks until you are happy that it is straight as you can possibly get it. The drill then needs to be allowed to dry before it can be used. During this drying period you should check regularly that the drill is drying straight and not reverting to its previous shape. As before, any kinks or bends should be removed by applying some heat and bending the relevant area.
For your hearth, one of the best materials to use in combination with elder is dead, dry clematis. This is not the most common of plants. It likes to grow on chalky soil such as found on the North Downs and close to the coast in Kent. Other materials that you might like to try for hearths include, willow, sycamore, Norway maple, field maple, cedar and aspen.
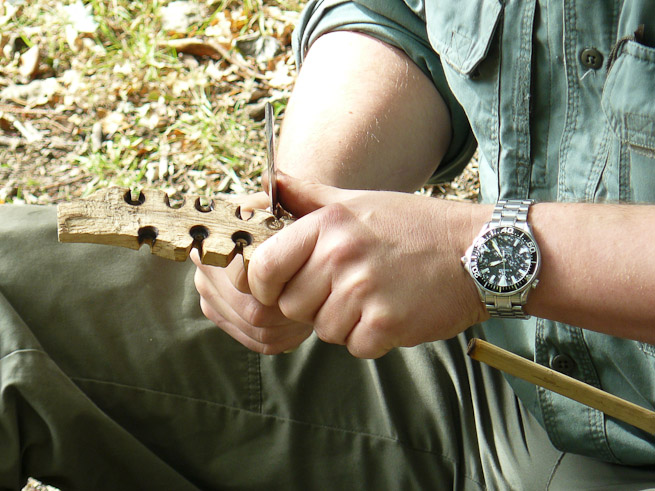
As with the bow drill, you should aim for a hearth of the same thickness as the diameter of the drill. A small depression is created, into which the drill is seated. You then cut a notch approximately one-eighth of the circle.
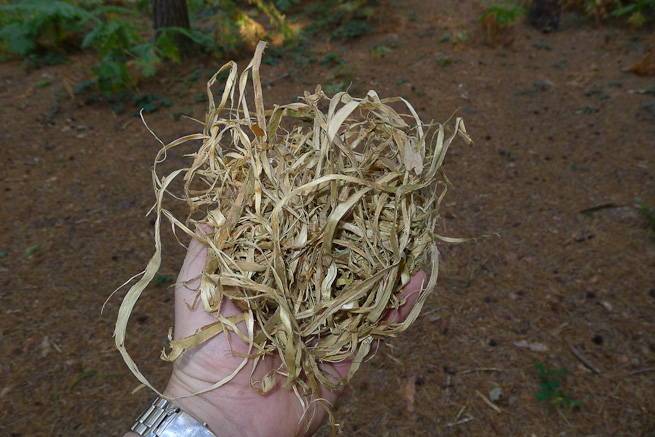
There are several good, easily-available sources of tinder in the northern temperate zone. One of them is the outer bark of honeysuckle. Any tinder should be prepared as thoroughly as possible, generally in order to make it finer and increase its surface area.


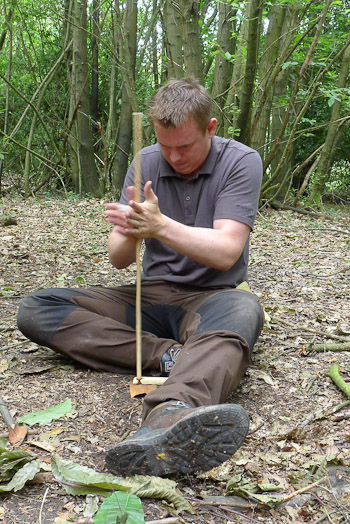
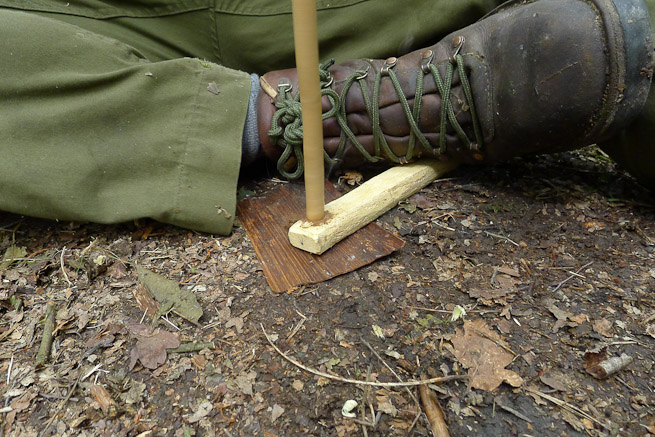
Hand drill technique
In terms of technique, you have less mechanical advantage than with bow drill. The technique, however, requires less physical coordination. From having taught both techniques, it seems that people naturally find the coordination required for the hand drill technique easier than the bow drill technique. The weak link in the chain is the condition of their hands.
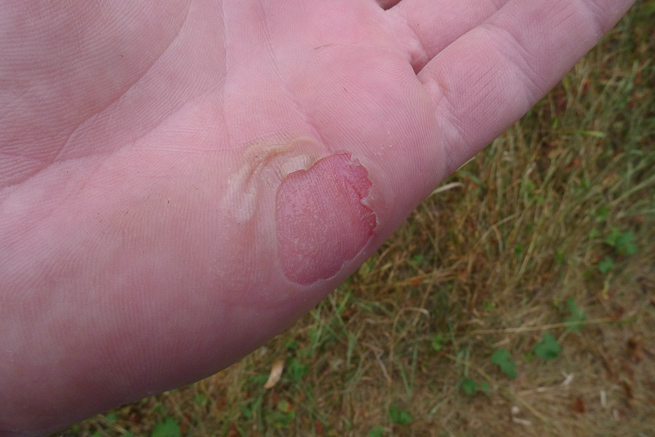
Hand drill – and the clue is in the name – requires the use of your hands to propel the drill directly. This requires some grip between your hands and the drill which, in turn, causes some wear and tear on the palms of your hands. Over time, your hands – like your feet when walking barefoot – gain some conditioning. This makes progress with learning hand drill potentially painfully slow to begin with or, if you rush it, just painful.
A common difficulty is not applying sufficient pressure in order to generate the requisite friction. A sign that there is not enough friction is dust that is too light. Light dust shows you are removing material but it is not getting hot enough.
It is very easy for real beginners to do too much too soon with soft hands and either blister the hands or remove skin. This can also happen to people who are adept at the hand drill technique, having achieved fire by this means many times before but not practiced it for some time. To be on top form with hand drill you need to maintain your hands in good condition. This means practicing hand drill regularly.
What about floating hands?
Frankly, I have nothing against the floating hands technique per se but I do think it muddies the waters. For beginners learning what they really need to know to create a fire by this technique, the concept of floating hands gets in the way. You don’t need it. Furthermore, I have never seen a person who truly relies upon hand drill for day-to-day fire-lighting use floating hands. The most important part of hand drill technique is spinning the drill combined with downward pressure.
So, my advice is to keep it simple and practice this combination, i.e. spinning the drill with downward pressure. If I can give one tip with respect to this, it would be to spin fastest when your hands are close to the top while using light pressure; then, as your hands descend the drill apply more pressure with a lower speed. This seems to be the best overall combination. You then need to return to the top of the drill as rapidly as possible and repeat.
If you feel that you are not rotating the drill for long enough or achieving a sufficiently long descent of the drill, then the easiest solution is not to start to learn floating hands technique, but to get a longer drill. Again the Hadza provide a great example of this with their very long drills.
With hand drill, practice certainly makes perfect but when learning you should know when to stop. My overall advice to hand drill novices would be to practice little and often, building up hand condition.
Also stick with the same materials until you achieve an ember. Once you have achieved an ember several times with elder on clematis, for example, then you can start to experiment with other drill materials are other hearth materials, varying one at a time.
Most of all, don’t be afraid of hand drill. Soon, you too will be able to harness this simple and elegant fire-lighting method.
Advance Your Bushcraft Skills
If you’re interested in advancing your bushcraft skills in areas such as hand drill in a structured way under expert guidance, then our Intermediate Wilderness Bushcraft Course could be right for you. Check it out via the link below:
Intermediate Wilderness Bushcraft Course (6 days)

The Intermediate Wilderness Bushcraft Course starts where most bushcraft courses finish. Extending and expanding on bushcraft fundamentals, this course will allow you to take your skills and knowledge to the next level and gain an increased understanding of nature, bushcraft and yourself.
Find out more…
Latest posts by Paul Kirtley (see all)
- The Swedish Firesteel - January 5, 2023
- Kevin Callan and Paul Kirtley in Conversation - April 25, 2020
- Kevin Callan and Ray Goodwin in Conversation - April 18, 2020
Elen Sentier
Excellent article, Paul … unfortunately no good to me at all (you’ve seen my twisted hands !!!) but shall post this around as it will be most helpful for others.
ATB,
Elen
Paul Kirtley
Yes, Elen, I’m sorry to say you are not going to get on very well with this technique.
I really appreciate you sharing it with others.
Many thanks,
Paul
Richard
Another excellent article – many thanks! It has been on my ‘to try’ list for quite a while but now, equipped with a clear indication about the best materials to use, I think I might just give it a go. Or lots of goes. Actually, as many as are required until my hands are worn to bloody pulp or hardened to a state of leatheriness!
Paul Kirtley
Thank you Richard. Please do just go for it – but if you don’t know when to stop, don’t blame me! 😉
I look forward to shaking your leathery hand the next time we meet 🙂
Warm regards,
Paul
Niels
Good article. I think the main use of the floating hands technique is the fact that you can use the shorter pieces of wood, like burdock stems, when you have to do it from scratch, as it’s very hard to find a long straight dry drill in the field. I’ve only gotten embers the normal way so far though.
Paul Kirtley
Hey Niels,
Yes this is a very big advantage of the floating hands technique.
Best,
Paul
Carl Culley
Hi Paul, Guess what’s at the bottom of my garden? Great article! I do read them and this really opened up my eyes. Just need to find some wood for the hearth and if I practice, practice it’s one more for the box of “How to make fire” for the scouts 🙂
Paul Kirtley
Lucky you! Have fun and let us know how you get on.
dave brannigan
I’m sorry to say Paul but I wholeheartedly disagree with the part about floating hands in this article and i’m sure if you were skilled in this technique you would not be putting it down per se. Just because the folks in africa etc don’t do it (i’m sure they would if they learned how), doesn’t mean it doesn’t work or is of lesser value than the normal hand drill. As DIFFERENT as the hand drill is from the bow drill, ditto the float method from standard hand drill. Its another string to thee old bow fella. Its a completely different skill that personally should not be overlooked by beginners or seasoned stick spinners. The advantages being that a person who learns the technique can get coals with drills under 4 inches.. Something unobtainable with standard hand drill. It means you don’t have to find long drills, spend ages straightening etc. And if you break a drill doing standard technique it requires a new spindle (not if yer can float though). With the floating technique you can utilise and take full advantage of small drills the likes of tilia which as you know grows kinda zig zag on the suckers or burdock which again can grow overly zig zag and only produce a section of suitable material 4-5 inches long. You cant utilise the small materials with the normal up down method unless of course you spend time and effort attaching a small section of suitable wood to a long drill, but why do all that if yer can float a small drill. I spent years sat on my backside and taught meself how to do the floating hands fire method with 3-5 inch drills and i’m very proud of it. No one showed me and I learned the hard way through trial and error. Its equally technical, requires greater endurance and a good degree of flexibility to assume the position to spin the stick. I’m gonna be uploading some videos soon on youtube and anyone is more than welcome to check them out. As I say its free and anyone can check it out. The technique is a stand alone technique and not just a back up technique. Its suitable for beginners or seasoned stick spinners.
The rest of the article fella is top draw.
All the best, dave b
Paul Kirtley
Hi Dave,
Thanks for commenting. I’ve always appreciated your straighforward – some would say blunt – approach to communication. It’s normally pretty clear where someone stands with you 🙂
But here you say you are disagreeing with me but reading your comment, it’s not clear what you are disagreeing with.
What I wrote in the article is as follows:
“Frankly, I have nothing against the floating hands technique per se but I do think it muddies the waters. For beginners learning what they really need to know to create a fire by this technique, the concept of floating hands gets in the way. You don’t need it. Furthermore, I have never seen a person who truly relies upon hand drill for day-to-day fire-lighting use floating hands. The most important part of hand drill technique is spinning the drill combined with downward pressure.”
You say “i’m sure if you were skilled in this technique you would not be putting it down”
First, you have no idea whether I am skilled in this technique or not, so you are just being rude.
Second, no-where did I put down the technique.
My point is that floating hands isn’t necessary to get an ember with a hand-drill. That’s just a fact. It’s not a value judgement.
You, yourself write in your comment, “As DIFFERENT as the hand drill is from the bow drill, ditto the float method from standard hand drill. Its another string to thee old bow fella. Its a completely different skill…”
You also write “The technique is a stand alone technique and not just a back up technique.”
So it seems we are agreeing – you don’t need floating hands for “standard” or “traditional” hand-drill.
That was also the point I was illustrating with my experience of indigenous peoples – they use hand-drills everyday without the need for floating hands.
In my experience in teaching many, many people on bushcraft courses it’s clear that people are afraid of hand-drill. They think it is difficult. They think it is complicated.
And there are a lot of people on forums and websites who like to make it seem that way to increase their status in those communities. I’m not implying you do, just to be clear.
The article above is aimed at cutting through this, to give people what they need to make an informed start with learning hand-drill without being completely daunted by it. The title is “Getting To Grips With Hand Drill”, not “How To Master Every Aspect Of Hand Drill”. It is clearly not a complete treatment – it looks at one main drill material, one hearth material and one tinder material. And it looks at one technique, which is the easiest way to learn.
As I say, floating hands muddies the waters.
People end up not knowing what technique they should be trying or with which materials.
It comes down to analysing what is necessary and what is sufficient.
Many people who are skilled in the floating hands talk about it being hard to learn.
You, yourself write in your comment, “I spent years sat on my backside and taught meself how to do the floating hands fire method…”
This type of talk puts some people off hand-drill altogether.
I know because they tell me.
Is it necessary to sit on your backside for years before getting a hand-drill ember? No. Is the information and methodology above sufficent to allow you get an ember within a week. Yes it is. I know this because it happens repeatedly on our Intermediate Wilderness Bushcraft course.
My job is to enthuse, encourage and enable. And this was the aim of the article.
Now to the part of your comment that irritated me (and I’ll be as blunt here as you always are with me):
“Just because the folks in africa etc don’t do it (i’m sure they would if they learned how)…”
Dave, did you really write “I’m sure they would if they learned how”?
I’m hoping you didn’t mean it the way it comes across because it portrays you as yet another in a long line of white men who thinks he knows better than the natives.
Let’s not even go there.
I look forward to watching your videos.
Please feel free to post a link here.
All the best,
Paul
Terry
As always, clear and concise, informative and well illustrated. When are you going to write a book?…
Cheers
Paul Kirtley
Thanks Terry. I’m glad you think I could. I’ll add it to my long to-do list 🙂
Cheers,
Paul
mike kennedy
Nice presentation! I am definetly going to try to master this.
Paul Kirtley
Thanks Mike. Let me know how you get on with it.
danny
Thanks for another great article Paul.Every now and again I,d decide to learn this technique and it always got the better of me.My best results were with an Elder drill and hearth and though they,d be smoking well I never managed to produce an ember.Along with having the wrong hearth wood the drill wood always seemed too flimsy to apply pressure too and would fall apart.As soon as I read this article it became crystal clear where it all went wrong.I went and cut some drills earlier 2day.How long would you recommend for drying time,is it a case of seasoning the wood or just giving it a chance to dry off?Also,would Grey Willow do for the heath wood.I havn,t been able to locate Clemitis in southern Ireland but these lots of Grey Willow and Sycamore.Thanks again for the article Paul,you explained each step very simply and it makes the whole process crystal clear and I cant wait to get stated…
Paul Kirtley
Hi Danny,
I’m glad you found this useful. I hope it helps you achieve an ember.
As for drying the drill – once the bark is off, a day or two in warm weather will see it dry enough.
Willow can work well – you need to get the balance right between too hard and too soft. Sycamore can be a bit tough when well-seasoned. But if it’s a bit softer it can work but it’s tougher than clematis for sure. You could also try ivy.
Let me know how you get on.
Cheers,
Paul
Ruud
These articles are a joy to read!
Had a go with the handdrill, used a thin piece of hazel as the drill and a bigger piece of hazel as the hearthboard, worked perfectly.
I found it actually quite easy to learn, since I already knew how to get an ember using the bowdrill. I was able to ‘read’ the dust better and you just get that feeling of the actual friction doing the job.
Greetings from Belgium
Paul Kirtley
Greetings Ruud!
Thanks for your comment – I’m glad you are enjoying our articles.
I’m also glad to hear you had success with hand-drill. Interesting that you used hazel for your first time. You are right that knowing the ‘feel’ of friction firelighting from one method, helps you learn others.
Warm regards,
Paul
George Aitchison
Hi Paul
Thanks for taking the time to write this article.
Always good to hear of others experiences with this method.
You are quite correct about the blisters appearing even if you have mastered the technique before, not to mention the internal bruising you feel.
Seeing peoples faces when they master the bow drill is a joy but when they get the handrill for the first time they are ecstatic.
I try with many of my students to double up at first to take turns drilling. Apart from giving them a break it allows them to study the method while someone else twirls.
Cheers again.
George
Paul Kirtley
Hi George,
It’s very nice to hear from you – thanks for posting.
I couldn’t agree more about the look on people’s faces when they first achieve fire-by-friction. It’s one of the great joys of teaching this subject.
You are also right about the value of having students double-up to take turns drilling. This is something I do on our Intermediate course and it does indeed work very well – both in terms of a training aid but also in being effective in achieving the ember.
Warm regards,
Paul
Kes Harker
Hi Paul
I have only just got around to reading this ,Excellent as ever a balanced article and all good common sense. I have also found in my own experience that smaller children have a greater success rate with a well constructed hand drill than a bow drill, not what I had expected!
Paul Kirtley
Hi Kes,
Thanks for your comments about the article. I’m glad you enjoyed it.
I was interested to read about your successful introduction of young people to hand drills. Thanks.
Warm regards,
Paul
Marc
Great article Paul! Honestly one of the best I’ve seen ever! I live in Ireland so this applies to me also. I’ve been trying for a long time to get an ember with hand drill but fail time and time again. I have one question. When you say that you should cut the elder green and let it die and dry out. How long should I wait for it to die and dry? And where should I put it to die and dry out? Also when you say to cut it green do you mean straight off the tree? Thanks for the help!
Marc.
Paul Kirtley
Hi Marc,
Thanks for your feedback – I’m happy you found this article so useful.
Yes, cut the elder green. You need to scrape off the bark and straighten into something which closely resembles a dowel while it is still moist. Use the heat of a fire or stove to soften it. Bend and hold. In summer conditions and with the heat of straightening, the drill should be good to go two days after you cut it (as long as you’ve removed the bark fairly soon of course).
Hope this helps.
Warm regards,
Paul
Michael
Hi Paul,
Tank you for another helpful article. You are right. The myth around the difficulty of the hand-drill tends to ward off people from trying this technique. It definitely was the case with me. So I started with attempts on the bow-drill. As I know now my set up was not good. Spindle too short, bearing block too soft, string too weak. I usually got good black dust and a lot of smoke but unfortunately more on the upper end of the spindle rather than on the lower end. The movement felt awkward and terribly exhausting. Usually I had to give up, the spindle flew away or the string broke. After some then or so trials I gave up and switched to the hand-drill. After consulting YouTube I started with a hand-drill spindle of mugwort – artemisia vulgaris – and a hearth board of a bit of soft wood from the diy-store. I suppose it was spruce/pinius alba. I immediately got black dust after one minute or so and dense smoke after one more minute. The movement felt considerably more comfortable than with the bow-drill. However, I had to stop because of exhaustion and the forming of water-blisters on my hands. After some rest I went for another try. It was promising but the water-blisters in my hands changed to blood-blisters. After two weeks the skin on my hands felt hard and strong so I tried it again. After three minutes I had a glowing ember and I was puzzled and very happy at the same time. You are definitely right recommending to train the hand-drill often but shortly. I usually make my attempts on the weekends and pause during the week but I still get blisters when I push too hard or pause for some weekends. And it really helps to smothe the surface of the spindle as much as possible. Meanwhile I experimented with hearth-boards of willow and poplar and all work well. I read that mullein – Verbascum – should work well as a spindle and harvested some very dry and hard stalks. So far I was not successful with mullein spindles. The wood seems to be too hard and produces only very little dust which smells much better than the mugwort dust by the way. After reading your article Iam looking forward to try sambucus nigra on clemantis. Actually both are quite common in my part of Austria. I find it helpful not to overexpand the fingers/hands while drilling because then you stretch your skin/flesh and loose all the soft padding which increases the chance to build up blisters. It is also important to use the thicker end of the spindle on the lower side, i.e. on the hearth. So you have the thinner side in your hands. The smaller diameter means more turns over the length of your hands while drilling which results in higher speed. It’s good to have physics on your side. I also tried floating. After two weeks of training I was able to keep my hands at the same hight while drilling but Iam not able to build up enough pressure to ignite the dust. So for now I cannot use floating to have the advantage of shorter spindles. Nevertheless I find the technique very usefull because it prevents me from getting blisters and helps me to save power for the final effort. My way is to start with floating to warm up the material and to produce dust. Since I don’t have to interrupt for changing the grip I can keep the speed high and the pressure low which saves power and prevents from getting blisters. When I have some dust or even light fume I switch to the classic hand-drill to increase the pressure. Usually after 10 to 20 seconds the fume becomes very dense and the mugwort literally spits thick black coal dust when heated up enough. Awesome material. After 20 more seconds the dust starts to glow. At least in most of the trials. 🙂 Meanwhile I made some little changes on my bow-drill set and was able to get an ember two times. I have to admit so far I don’t like the bow-drill very much because it is just too complicated and exhausting for me in comparison to the hand-drill. On the other hand I must say that for now I practiced only in the basement of my house or in the garden but always in very dry and favourable conditions. I can imagine that it will be a whole different story in wet weather. So I read with interest your experience of the bow-drill to be less prone to failure in bad weather. Hopefully it is just a matter of technique and I can finally make friends with the bow-drill on the elementary wilderness course in July. Really looking forward to it.
Best regards from Austria
Michael
ian
what materials would you suggest for the isle of wight.
Dave Welsby
Hey Paul, another great article. I was wondering how affective cat tail is for a hand drill. I have never tried it but read it could be used.
Paul Kirtley
Hi Dave,
It requires some skill to use. The stems can be quite fragile.
Warm regards,
Paul
Mark McDermott
An excellent article and a great discussion.I like the technique a lot and really love its simplicity. I definitely agree with the points on training the hands though, and on the point of making sure the drill is smooth to reduce blistering as this technique can really tear your hands up. I’ve not tried the technique in the UK and will have to give it a go next time I’m back over there. Here in central Texas the best hearth material i’ve used is from the Trumpet vine (Campsis Radicans), a plant found over much of the Eastern US. The plant is also called “cow itch” as the leaves, and sap can apparently cause rashes in some people. I was taught to process the hearth board with gloves on, but once processed and dried out i’ve had no problems with it. I’ve also used cedar hearth boards with success. For spindles I’ve used Horseweed/ Fleabane horseweed (Conzya canadensis), and Yucca. Other spindle plants I have been recommended include Mullein, Goldenrod (Solidago sp.), and Cat tail stems. I’m still learning to float my hands, and wouldn’t consider myself an expert at hand drill, but I haven’t found floating hands necessary to get a coal and agree that a lot of people are frightened of giving it a go because of all the talk of it being such an advanced skill. I don’t use particularly long drills, and one tip I was taught was that if you can’t float hands, and need to get your hands back to the top of the drill, you should quickly move one hand up to the top of the spindle, and maintain downward pressure with your thumb. This stops the loss of heat, while you quickly fix your hands into position to resume drilling.
Dave Howard
Hi Paul, thanks for this article, I am no longer able to use this technique, partly due to the athritis in my fingers and wrists. This prevents me from keeping adequate pressure on the spindle.i would definitely suggest that beginners use a spindle of at least 2`6″ long. This as you said gives a longer period of friction at a time which makes learning the required pressure needed far easier than using a short spindle.
All the best, Dave.
tony 131
Hi Paul, thank s for these excellent and encouraging articles. I’ve skirted round this bushcraft subject for years and enjoyed it, didn’t realise, till I hit your blog what I have missed. Looking forward to the meet up in July. all the very best, tony 131
Paul Kirtley
Hi Tony,
Thanks for your kind words – I’m glad I’ve managed to tease out an interest that was always there. Looking forwards to meeting you too 🙂
Warm regards,
Paul
Rory
A great instructional on the hand drill Paul, thank you for the knowledge and inspiration mate. You’re the best European source of information (wood types etc) on the net, plus you got the teaching knack down pat.
Paul Kirtley
Thank you Rory. Glad to be of assistance.
Warm regards,
Paul
Marcel Lafond
You know Paul, you enticed me to try bow drill with your statement “it is a definitive moment in bushcraft.”, which it turned out to be. I enjoy getting fire from this method now. So, with my girly hands (we are forced to wear gloves all day long at work – a sad policy for “safety reasons”) I am considering finding myself an elder twig and try it. I have straightened arrow shafts using a candle flame, and that works well, so I may use that instead of a firepit. What do you think of using horseshoe fungus as a hearth? Or punky wood? Have you tried these, or will you just smile and let me attempt foolishly on my own?
Marcel
Craig Fordham
Hi Paul
Another interesting article. As you may know I’m a big hand drill enthusiast and being able to do it well on demand and to teach others to do so is really what helped me “break in” to the Bushcraft scene at the shows etc. Like many I was daunted by the notion of hand drill having spent many years working with and under instructors who totally dismissed it as a viable survival skill. I’ve taken great delight in recent years of proving them wrong ;-). As for floating hands I think it IS a viable skill and there is a place for it but totally agree that beginners shouldn’t focus too heavily on it. I spent a year training daily with ice poles to perfect my technique and harden my hands to the point where I can regularly get embers in under 20 seconds with even short drills, I freely admit this is a “party trick” though I do at shows and demos to attract people in. In reality I try and encourage people to get a rough float going just to build up some heat before doing a couple of good, strong downward passes to bust out an ember. I also agree with you that it’s possibne to get people achieving an ember in a short course. Only thing I’d say about the Elder is that I’ve never bothered removing the bark, just any noticeable lumps as I find it helps me grip the shaft more and create greater downward pressure. I’ve also regularly got people to use things like pine resin on their hands to make them a bit stickier and found this really helps people create more downward pressure and subsequently get embers easier.
My interest has led me to go out into various different environments and see if I can find materials in situ that I can use to create fire from hand drill friction and I’ve had a fair bit of success with a variety of drills and hearths. Elder on Clematis will always be my favourite though, especially for beginners. If you want a fun challenge that will really get your shoulders and hands working try Hazel on Hazel 😉
Great article as ever Paul. All the best
Craig
Steven Aley
Hi Paul!
Great article, many thanks for sharing! Hand drill is next on my list to learn, just wondering about alternatives to elder, there is plenty around here at the moment but I am moving next year.
I’ve heard burdock stems and also teasel make good drills, can you confirm this at all?
Thanks again for the easy read article!
Regards
Steve.
Paul Kirtley
Hi Steven,
There is no direct equivalent to elder for hand drill.
Other materials can be used but the species you mention are substantially different. Burdock stems are never particularly straight; they are always slightly angled at the nodes. You can sometimes use short sections though.
Teasel is naturally straighter and works quite nicely if it is in firm enough condition. You’ll probably need a slightly softer hearth board than you might use with elder though.
Even woody sections of ragwort, Senecio jacobaea can work but they tend to make quite short drills.
Hope this helps.
Warm regards,
Paul
Suzane
Great article and just what I was looking for, thank you Paul (link to this was posted in the comments on your bow drill article).
I’ve not tried either yet. But I do want to learn both and have been scouting my local area for suitable materials.
I do have a piece of elder which I cut from a tree last week. Bark stripped, heat straightened the worst bend, I even used a razor blade to smooth out the bumps where buds/side shoots were. Now I just need to find a suitable piece of wood for the hearth board and I can then at least start conditioning my hands. I saw some decent sized dead ivy on a fallen tree a few days ago, or alternatively, there are a lot of sycamore trees locally, lots of alder and elder, silver birch, a few horse chestnut (any use ?), ash… too many to choose from Help ! I’m confused now.
I think the only trees I’ve not seen locally are hazel, willow and sweet chestnut.
Paul Kirtley
Hi Suzane, thanks for your comments. For the hearth board for your elder hand drill, I would recommend clematis or ivy as relatively easy-to-find woods that you should be able to get to work with some practice. Also consider any dead Cupressaceae you might have access to (particularly cedar, genus Thuja, or juniper, genus Juniperus).
But also another general comment, definitely take it easy on your hands to start with.
All the best,
Paul